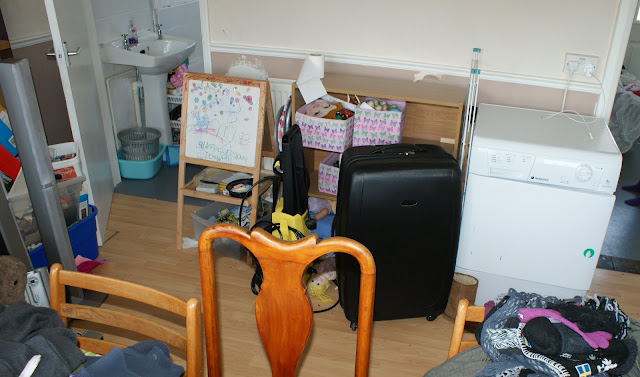
Day 10 - Easy Wrapping Paper and Craft Tool Storage


I have found a solution for storing my wrapping paper and vinyl rolls. First I screwed cup hooks into the back of the cupboard (with a bit of help from Hubbie), then I cut string to various lengths (so that my rolls would hang at varying heights) and threaded each piece through the centre of the rolls, I made loops at both ends of each piece of string, then simply hung the loops on the cup hooks. I also used an idea I saw on pinterest and cut some toilet rolls down one side to place around my paper to keep the ends tidy. Now my wrapping paper is nicely out of the way and I can access it easily.

Materials and Expenditure
Cup hooks (2) - 4p each from Hursts
String -  I already had in the draw - 0p
Toilet Rolls  - from my Junk Store - 0p
Total cost - £0.08p


The top part of this cupboard - where the wrapping paper is now stored, used to contain a wine rack full of alcohol (mainly spirits) that Steve had received as presents from customers over the years, most of it had never been opened so it's been boxed up whilst we decide what do do with it.  Alongside the alcohol was some of those free wine carriers that you get from supermarkets. I realised that one of these would be perfect for storing all my craft tools and bits and pieces. So I took one with nice square compartments, gave it a couple of coats of acrylic paint to strengthen it, hot glued in some boxes and pots from our junk store and there we are - a new craft caddy/trug.

Materials and Expenditure
Cardboard wine Carrier - free from Tesco's  - 0p
Small amount of acrylic paint - from my craft storage - I guess I may have used 10p's worth.
Recycled pots and boxes - from junk box - 0p
Total cost - £0.10p


Craft Cupboard List
  •  Empty and paint inside. 
  •  Decorate door panels with cherry blossom  artwork.
  •  Create new height chart - cherry blossom?
  •  Make paper storage files and organise paper and card stock.
  •  Make pen/craft caddy/carousel. 
  •  Green and Pink play rice could be stored in glass jars and used as decorative item?
  •  Make or buy shelving to make compartments for organising paint, beads etc.
  •  Come up with a way to store wrapping paper. 
  •  Make spice rack type storage for inside doors to store paint etc.
  •  Make caddy for glue gun and other craft basics.
  •  Make a tape dispenser.
  •  Decide on a way to store ribbon.
  •  Collect and decorate jars to store embellishments/glitter etc.


Days 8 and 9 - Diy Cereal Box Files


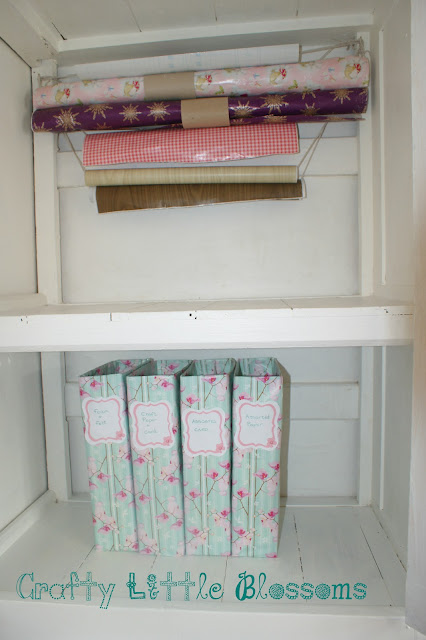
Here is my new storage system for our Craft papers etc.. Made from Cereal boxes (large,stores own rice crispies or cornflakes boxes work best for A4) and wrapping paper. I designed the labels to go with the boxes, (http://craftylittleblossoms.blogspot.co.uk/p/free-printables-and-downloads.html) then simply printed and cut them out. I know they're not all nicely lined up, but in my quest to let go of perfection I'm trying to except that and am fighting the urge to redo them all.

Total cost - just £1, which was for the wrapping paper bought from the pound shop, one roll covered all 4 boxes with some to spare.

Craft Paper, Card, Foam and Felt - Before


Craft Cupboard List
  •  Empty and paint inside. 
  •  Decorate door panels with cherry blossom  artwork.
  •  Create new height chart - cherry blossom?
  •  Make paper storage files and organise paper and card stock.
  •  Make pen/craft caddy/carousel. 
  •  Green and Pink play rice could be stored in glass jars and used as decorative item?
  •  Make or buy shelving to make compartments for organising paint, beads etc.
  •  Come up with a way to store wrapping paper.
  •  Make spice rack type storage for inside doors to store paint etc.
  •  Make caddy for glue gun and other craft basics.
  •  Make a tape dispenser.
  •  Decide on a way to store ribbon.
  •  Collect and decorate jars to store embellishments/glitter etc.

Day 7 - Craft Cupboard Organization

I've decided to get started on organising the craft cupboard. I'm going to be needing to use my craft supplies a lot as the house improvements continue, so it makes sense to get it done as soon as possible.

I'm afraid I got a bit carried away and forgot to take a before picture with all the stuff in it, but this is the cupboard in it's bare and original state.


This is everything that came out, it doesn't look too inspiring like that, but there are some lovely and very useful things in there, honest!


And this is Mollie (with her dinner still round her face - what a terrible mother she has, poor child) having a wonderful time in what she thinks is now her den - hopefully she'll get over the disappointment when it turns back into our crafting haven!


After a good clean, a bit of sanding down and a lick of paint, it's looking fresher and ready to house some (hopefully) well organised craft equipment. I'll be starting on that project tomorrow  by making some diy paper storage files!

Craft Cupboard List
  •  Empty and paint inside. 
  •  Decorate door panels with cherry blossom  artwork.
  •  Create new height chart - cherry blossom?
  •  Make paper storage files and organise paper and card stock.
  •  Make pen/craft caddy/carousel. 
  •  Green and Pink play rice could be stored in glass jars and used as decorative item?
  •  Make or buy shelving to make compartments for organising paint, beads etc.
  •  Come up with a way to store wrapping paper.
  •  Make spice rack type storage for inside doors to store paint etc.
  •  Make caddy for glue gun and other craft basics.
  •  Make a tape dispenser.
  •  Decide on a way to store ribbon.
  •  Collect and decorate jars to store embellishments/glitter etc.


Dining and Craft Room - Days 5 & 6

More decluttering and wiping down.
1.
Some of the DVDs and c.d's went to the charity shop. The DVDs that were left were boxed and moved to the living room as I plan to create new storage for them there. We are going to transfer all the c.d's to iTunes and they'll then be stored in the loft.
2.


3.


4.
Oh dear! What a lovely sight washing piles (clean I might add) waiting for the respective owners to put away.


5.
Shelves all clear ready to be adorned  with the new decorative treasures, which
I'm planning to both make and hunt down in charity shops. Hmm, Son no.4's sock and axe seem to have appeared here already, which just goes to show how hard it will be keeping things in order. I think I'm going to need an action plan for getting the family to cooperate, but I guess setting an example is a good place to start. 
6.


This small window has always intrigued us, it seems an odd design - we have one large main window (as can be seen in pic 4) and next to it this extra little high window!


 Dining and Craft Room List

  •  Keep current paint scheme for walls - finish painting.
  •  Declutter one area at a time.
  •  Wipe down walls.
  •  Repaint /clean woodwork where needed.
  •  Decide on theme - Cherry Blossom, Pink Roses, Bluebirds and Owls.
  •  Choose colour scheme for ornaments/accessories - Pink, Green White, Blue.
  •  Make peg boards to display artwork.
  •  Make paper/fabric letters GALLERY - to put up over art area.
  •  Design/Print and frame quotes and wall art/family photos.
  •  Make colour block notice board as on pinterest using felt and thick/layered card board? 
  •  Collect and decorate bottles to be used as vases/ornaments.
  •  Declutter manual box and create attractive storage for necessary manuals.
  •  Laminate patterned paper and make into light switch covers?
  •  Use decorated wrapping paper roll as cable tidy?
  •  Repurpose chest of drawers from boys room to use as dresser/material store.
  •  Turn drawers into shelves/plate rack/crockery store.
  •  Get rid of old desk and make or buy new one. See day 3!
  •  Find a way to enclose Electric meter. See Day 4!


Dining and Craft Room - Day 4

Steve re-purposed an old bathroom cabinet that has been sitting around in the shed for a couple of years - it now disguises the electric meter but leaves it easy to access when we need to.


It will look a lot better with a  coat of paint or two.

  
 Dining and Craft Room List

  •  Keep current paint scheme for walls - finish painting.
  •  Declutter one area at a time.
  •  Wipe down walls.
  •  Repaint /clean woodwork where needed.
  •  Decide on theme - Cherry Blossom, Pink Roses, Bluebirds and Owls.
  •  Choose colour scheme for ornaments/accessories - Pink, Green White, Blue.
  •  Make peg boards to display artwork.
  •  Make paper/fabric letters GALLERY - to put up over art area.
  •  Design/Print and frame quotes and wall art/family photos.
  •  Make colour block notice board as on pinterest using felt and thick/layered card board? 
  •  Collect and decorate bottles to be used as vases/ornaments.
  •  Declutter manual box and create attractive storage for necessary manuals.
  •  Laminate patterned paper and make into light switch covers?
  •  Use decorated wrapping paper roll as cable tidy?
  •  Repurpose chest of drawers from boys room to use as dresser/material store.
  •  Turn drawers into shelves/plate rack/crockery store.
  •  Get rid of old desk and make or buy new one. See day 3!
  •  Find a way to enclose Electric meter. Thank you Steve!


Dining and Craft Room - Day 3.

Day 3 and it seems revamp fever is spreading to other members of the family!


Today saw the departure of our old overloaded, rickety computer desk, it was originally part of an mfi bedroom set that used to belong to son no. 1. In it's place my clever hubby created a new computer station from a piece of left over worktop, donated by a friend and a bookcase brought from argos  for £15. The book case will hold the xbox and all it's games - which I hate, but I'm outnumbered and out-ruled by the males of the household, so I've given up protesting, at least it will  be pretty much out of sight now.


Before (cringe)
The filing cabinet is heading for the master bedroom, where we plan to create an office space away from sticky fingers.


Steve fixing the wooden batons in place, these will support the left hand side of the worktop.


Jakey helping to keep the dust at bay.


All Finished (pic taken on Day 4)

We still need to find a solution to hide and make safe all those trailing wires. I will most likely make some pretty boxes to further disguise all the xbox paraphernalia, but I think it's still an improvement.

   
      Dining and Craft Room List

  •  Keep current paint scheme for walls - finish painting.
  •  Declutter one area at a time.
  •  Wipe down walls.
  •  Repaint /clean woodwork where needed.
  •  Decide on theme - Cherry Blossom, Pink Roses, Bluebirds and Owls.
  •  Choose colour scheme for ornaments/accessories - Pink, Green White, Blue.
  •  Make peg boards to display artwork.
  •  Make paper/fabric letters GALLERY - to put up over art area.
  •  Design/Print and frame quotes and wall art/family photos.
  •  Make colour block notice board as on pinterest using felt and thick/layered card board? 
  •  Collect and decorate bottles to be used as vases/ornaments.
  •  Declutter manual box and create attractive storage for necessary manuals.
  •  Laminate patterned paper and make into light switch covers?
  •  Use decorated wrapping paper roll as cable tidy?
  •  Repurpose chest of drawers from boys room to use as dresser/material store.
  •  Turn drawers into shelves/plate rack/crockery store.
  •  Get rid of old desk and make or buy new one. Desk made thanks to Steve!
  •  Find a way to enclose Electric meter.


Dining and Craft Room - Day 2.

Today I tackled the chimney breast wall. Hmm what a mess - all that junk is the various boxes, plastic containers, bottle tops etc. that I keep for our craft projects. Up until now it has lived in these plastic boxes but as you can see it's a bit of a chaotic eye sore.  The home cinema system went up to the landing ready for hubs to put in the loft as we're not using it at the moment.


Chimney Wall Before.


Luckily we had a spare garden container in the back garden, I decided to put it under the front porch (after a bit of a tidy up) to keep it drier,  it provides the perfect home for our crafting supplies. 


Much Better.


Front Porch Before.

The white bag was full of stuff to give away so I took that to a local charity shop. The buggies are past using so they went on a pile in the garden destined for our next trip to the dump.


After


Then a bit of a wipe down of the walls and that area is ready for painting. The only thing left was the sewing machine which will have a home in the craft cupboard once it's sorted.


Chimney Wall After


     Dining and Craft Room List

  •  Keep current paint scheme for walls - finish painting.
  •  Declutter one area at a time.
  •  Wipe down walls.
  •  Repaint /clean woodwork where needed.
  •  Decide on theme - Cherry Blossom, Pink Roses, Bluebirds and Owls.
  •  Choose colour scheme for ornaments/accessories - Pink, Green White, Blue.
  •  Make peg boards to display artwork.
  •  Make paper/fabric letters GALLERY - to put up over art area.
  •  Design/Print and frame quotes and wall art/family photos.
  •  Make colour block notice board as on pinterest using felt and thick/layered card board? 
  •  Collect and decorate bottles to be used as vases/ornaments.
  •  Declutter manual box and create attractive storage for necessary manuals.
  •  Laminate patterned paper and make into light switch covers?
  •  Use decorated wrapping paper roll as cable tidy?
  •  Repurpose chest of drawers from boys room to use as dresser/material store.
  •  Turn drawers into shelves/plate rack/crockery store.
  •  Get rid of old desk and make or buy new one.
  •  Find a way to enclose Electric meter.


Dining and Craft Room - Day 1.

A little progress. I managed to get one wall/area decluttered and wiped down. 
We have a small kitchen so the tumbler (my life saver) lives here.
Before


After
     Dining and Craft Room List

  •  Keep current paint scheme for walls - finish painting.
  •  Declutter one area at a time.
  •  Wipe down walls.
  •  Repaint /clean woodwork where needed.
  •  Decide on theme - Cherry Blossom, Pink Roses, Bluebirds and Owls.
  •  Choose colour scheme for ornaments/accessories - Pink, Green White, Blue.
  •  Make peg boards to display artwork.
  •  Make paper/fabric letters GALLERY - to put up over art area.
  •  Design/Print and frame quotes and wall art/family photos.
  •  Make colour block notice board as on pinterest using felt and thick/layered card board? 
  •  Collect and decorate bottles to be used as vases/ornaments.
  •  Declutter manual box and create attractive storage for necessary manuals.
  •  Laminate patterned paper and make into light switch covers?
  •  Use decorated wrapping paper roll as cable tidy?
  •  Repurpose chest of drawers from boys room to use as dresser/material store.
  •  Turn drawers into shelves/plate rack/crockery store.


Dining and Craft Room.

I've decided to start with the dining/craft room as this is probably our most functional room and we use it a lot. We are a household of 7 for the majority of the time, (8 when eldest daughters boyfriend is home - he's in the army but lives with us at weekends and when on leave) our dining table is a place where we all gather for eating, crafting, learning, planning, working and playing. We have a well equipped art and craft cupboard but at the moment it's a complete disorganised mess, it's very hard to find what you need when you want it so I'm looking forward to getting it sorted.

My three youngest performing an experiment!

Here's the basic plan (it will probably expand as I go along):

* Keep current paint scheme for walls - finish painting.

* Repaint woodwork where needed.

* Accessorising ideas - green,cream/white,pink - polka dots,cherry blossom,birds/owl,flowers,
hearts.

* Make peg boards to display artwork - decide on design - green back boards with
jumbo pegs embellished with decorative tapes - gallery area- above dining table.

* Make paper/fabric letters GALLERY - to put up over area.

* Design/Print and frame quotes and wall art/family photos.

* make colour block notice board  using felt/ material and thick/layered card board?


Craft cupboard

* Empty and paint inside.

* Decorate door panels with cherry blossom  artwork.

* Create new height chart - cherry blossom?

* Make paper storage files and organise paper and card stock.

* Make pen/craft caddy/carousel to be kept on bookcase/desk popped on table when needed.
cream base board, pots attached decorated with craft paper/fabric.

* Green and pink play rice could be stored in glass jars and used as decorative item.

*Collect and decorate bottles to be used as vases/ornaments.

Action Plan!

Well if I'm going to succeed in creating the ideal home for our family I'm going to have to have an action plan:

* Make sure morning list is completed first before tackling revamping.

* Keep camera charged and ready - for before and after shots - this will hopefully help you realise what you've achieved.

* Make lists  for each room  of what needs to be done and any ideas.

* Work on a small area each day maybe  45mins - 1hr a day.

* Remember a little at a time  - don't take on more than you can manage in the time slot.

* Clean up as you go/when you finish the job!

* Remember to let go of  perfection!

It's Time To Get The House In Order!

This is something I have attempted many a time and I've often made good progress but I'm a bit of an all or nothing girl. I take on new projects with huge enthusiasm often totally over focusing  on that one area of my life, whilst the other areas get neglected - it's a totally self defeating habit - everything becomes a struggle, then I  burn out and lose interest.  I  am also a perfectionist if I can't make something perfect, I give up or don't bother at all, hmm... not a very kind way to treat yourself as you prevent yourself from achieving anything at all.
This is going to be quite a journey and I have a lot to learn along the way; taking tiny steps instead of big leaps, letting go of  perfectionism, setting manageable goals and completing them, being patient and compassionate with myself, and daring to share the junk heap that our house often resembles. Yes (gulp) I will be taking photo's of our abode in all it's glory as it suffers under the affliction of a large home educating household, whilst (hopefully) sharing each step of my progress as I release it and us from it's burden and turn it into an organised cosy home!